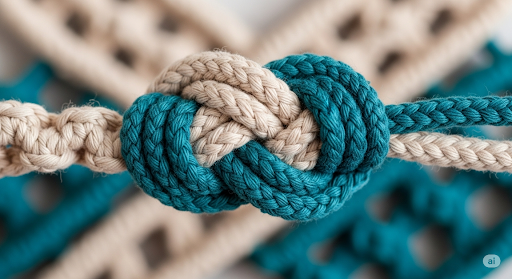
The Josephine knot is a gorgeous decorative knot that adds a unique, elegant touch to any macrame project. Also known as the Carrick bend in sailing, this knot creates a beautiful oval shape that looks much more complicated than it is.
This tutorial is designed for beginners and shows you how to tie the Josephine knot with two cords. You can use this technique to make bracelets, wall hangings, plant hangers, and more!
What You'll Need
-
Two macrame cords: For this tutorial, we'll use two separate cords. Using different colors can be a great way to help you see the steps clearly as you learn.
-
A pair of scissors: To cut your cord to the desired length.
-
A work surface: A macrame board, corkboard, or even just a flat table will work. You can use tape or T-pins to secure your cords in place.
Step-by-Step Instructions
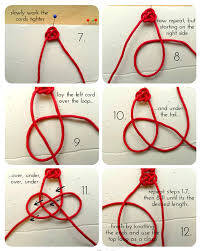
Step 1: Create a Loop
Start by taking the right-hand cord and creating a "U" shape or a loop. The cord should cross over itself so the working end is on top of the loop.
Step 2: Weave the Left Cord Over
Now, take your left-hand cord. Place it over the top of the right cord's loop, near the top where the two cords cross.
Step 3: Tuck the Left Cord Under
Continue with the left cord, passing it under the second cord of the right-hand loop.
Step 4: Bring the Left Cord Through the Loop
Bring the left cord up and over the first part of the right-hand cord. Then, pass the end of the left cord under the last part of the right-hand cord. Essentially, you're weaving the left cord over-under-over-under through the right-hand loop.
Step 5: Pull and Tighten
Gently and evenly pull both ends of the cords. As you pull, you'll see the knot begin to tighten and form its signature decorative shape. Be careful not to pull too quickly, as this can twist the cords and mess up the beautiful oval design. You'll want the knot to be flat and neat.
Tips for Success
-
Use two different colors: As mentioned, using two different colors for your cords when you first try this knot can make it much easier to follow the path of each cord.
-
Go slow: The key to a beautiful Josephine knot is a smooth and even tightening process. Take your time to adjust the cords and make sure they lay flat.
-
Practice makes perfect: Don't get discouraged if your first few knots aren't perfect. The more you practice, the faster and more precise your Josephine knots will become.
What will you create with your new knotting skills?

Add comment
Comments